Installing a 56K Modem and Using the MWAVE Card for Audio Support Only:

- Close all open applications.
- Right-Click on My Computer > Click Properties
- Choose the Device Manager tab
- Click on the [+] next to Modem
- Double-Click on the listing for your MWAVE modem
- The next step will depend on your version of Windows95/98:
If you see a box at the bottom of the General tab that looks like this:
![[X] Original Configuration (Current)](./DON5408/orgconfig.gif)
[Windows 95 OSR1, 4.00.950 and 4.00.950a]
REMOVE that 
If you see a box at the bottom of the General tab that looks like this:
![[ ] Disable in this hardware profile](./DON5408/disable.gif)
[Windows 95 OSR2 (4.00.950b and 4.00.950c) and Windows 98]
REMOVE the from "Exists in all hardware profiles"
- and -
ADD a to "Disable in this hardware profile".
- Click OK and close the Device Manager window
- Shutdown and Restart your Aptiva
The modem componant of MWAVE is now disabled.
You can now install your new modem and use the IBM MWAVE card for audio support.
IMPORTANT NOTE
While the information regarding disabling MWAVE modem support thus retaining it for sound support only is applicable to modems other than the USR Sportster I installed, as the MWAVE card is a software-based DSP card in order to install a second modem and keep MWAVE installed as the sound card the modem MUST be a conventional hardware-based modem and NOT a WinModem or other software-based card.
|
After performing the steps above one can often perform a
standard PnP (Plug and Pray) modem installation, as the
modem portion of the MWAVE card will no longer be utilizing
resources there should be no conflicts.
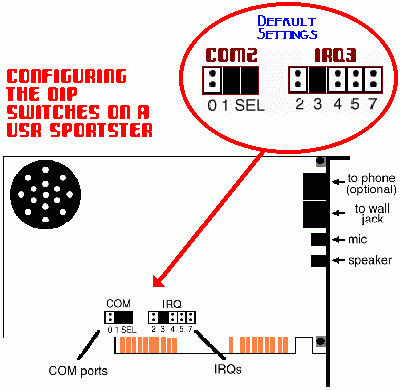
If all else fails if one has a modem with dip switches one can
perform a non-PnP install, hard configuring the modem to use
COM2 and IRQ3 using the following details...
Installing a USR 56k Faxmodem
as a Second Modem:
NOTE: These directions are applicable to the USR Sportster I installed in my 2176-C66 and will likely apply to many modems which feature dip switches to hard configure the modem to use a specific COM Port and IRQ. Check the documentation accompanying your modem for more specific details.
- Check your USR modem to confirm that it the dip switches are currently configured to use COM 2 and IRQ 3 (these are usually the default settings, you may not have to change anything)
- Shutdown and unplug your Aptiva
- Open the tower/case
- Remove the single screw from the frame releasing an expansion slot cover adjacent to an open ISA slot.
On systems that have both 8bit and 16bit ISA slots USR suggests using an 8bit ISA slot (the shorter of the two types) rather than a 16bit slot, however on my 2176-C66 and most Aptivas one will find only one type of ISA slot, with most models having PCI slots as well:
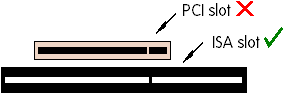
- Line up the USR modem and insert it into an ISA slot, rocking it gently back and forth until you achieve a tight fit.
- Replace the screw you removed in Step 4 and replace the cover.
NOTE: COM2/IRQ3 is normally assigned to the serial port, by installing a second modem to that port and IRQ one will have to either disable the serial port or do some serious IRQ juggling.
A serial port can be disabled either through the setup utility (F1
at startup) or using the same steps described at the top of this
page to disable the modem portion of MWAVE (by changing
the settings in the properties of "Communications Port [COM2]"
under "Ports [COM&LPT;]" in Device Manager).
Installing USR Modem Drivers via
Add New Hardware in Windows95:
- After installing your new modem start your PC
- Windows95/98 may detect your new hardware at this point. If it doesn't skip
to step 5. If it does and prompts you to insert your "driver disk" choose the option "Driver from disk provided by hardware manufacturer"
- Click OK
- Insert your "Connections" CD-ROM > Under "Copy manufacturer's files from" type G:\ (assuming G is your CD-ROM drive letter) > Click OK, Your USR modem is installed!
- If the Add New Hardware wizard does not appear when you restart Windows Click Start > Point to Settings > Click Control Panel > Click Add Hardware
- Click Next > Choose NO > Click Next > Choose Modem from the list
- Click Next > Check the box "Don't detect my modem I'll select it from a list"
- Click Next > Click on US ROBOTICS ACCESS CORP > Choose Sportster Voice 56000 Internal > Click the Have Disk button
- Insert your USR "Connections" CD-ROM > Under "Copy manufacturer's files from" type "G:\" (assuming G is your CD-ROM drive letter) > Click OK
- Your USR modem is installed!
NOTE: Make sure to change all your software (AOL, Dial Up Networking, HyperTerminal, etc) to now use your new modem on COM2 and use the maximum speed setting (57,600 or where available use the 115,200 setting)
Back to the Unofficial Aptiva Support Site
CLICK HERE TO GO

TO IN SEARCH OF
56K
DON5408's Unofficial IBM Aptiva� Support Site
| � 1999, Don Schneider |
|