Removing the MWAVE Card
(All Aptiva Systems): 1. Power off system. 2. Remove power cord from back of system or power source. 3. Establish personal grounding by touching a metal ground point
on computer with one hand before touching static-sensitive parts. 4. Note locations of, and remove, cables for telephone,
microphone, and speaker wires from back of computer. Remove any
joysticks connected to the system. 5. Remove cover from computer as shown below:
On desktop models, 2134, 2144, there is a squeeze button just above the floppy drive inside the System Unit Door. The button needs to be squeezed with one hand while the entire cover is slid to the front. The floppy and CD ROM drive remain with the system unit as the cover slides off to the front. 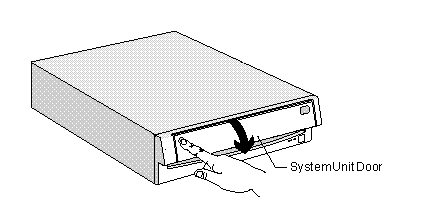 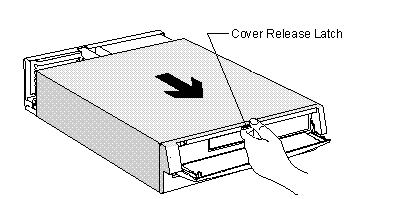
6. The MWave card is the modem card which containes the RJ-11 or
telephone plug (Illustration of MWave card at end). Note the location
of cables that are connected to this the card on the inside of the
system and unplug them. 7. If other cards are located above the MWave card, these cards must be removed. 8. Remove adapter card mounting screw at back panel of computer. 9. Remove card from slot, being careful not to pull on components on card. 10. Continue to remove cards until all cards are removed. 11. Set the NEW modem's JUMPERS or DIP SWITCHES to make the modem COM1 and IRQ 4. 12. Install your NEW modem card in the SAME slot where you removed the OLD modem. 13. Replace the internal cables to your new card.
This is the cable for Wake Up On Ring support and you will not have a connection for this on your new card. Make sure to tie this out of the way. 14. Replace cover, being careful not to pinch loose wires in cover as it is slid back on it's tracks. 15. Reinstall power cable. 16. Restart computer and test. 17. Reset the SPEED in your software applications to use the FASTER modem. (Illustration of MWave card at end). 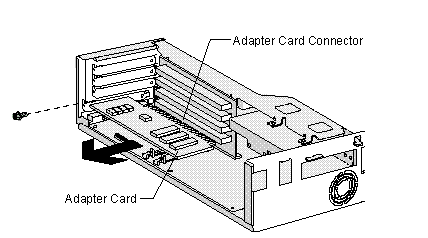
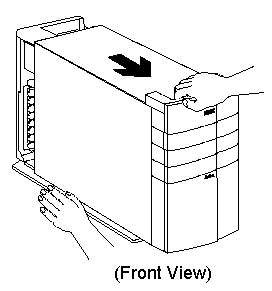
6.On tower models 2161, 2168, 2176, remove the cover by unscrewing the the two screws behind handle, grab the handle and pull cover toward front of computer. 7. The entire cover will slide on two tracks on bottom of tower.
If the cover sticks in the tracks, it can often be freed by a sharp jerk
forward on handle to remove it. An alternative method may be used:
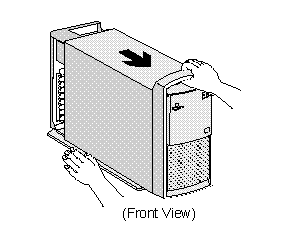
Place the thumb of your left hand on the CD-ROM below the drawer. Place
the fingers on your left hand on the floppy drive. Hold the handle with
your right hand. Now, pull with your right and push with your left.
Everything will slide forward except the floppy, CD-ROM and bay covers. 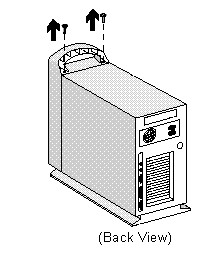
8.The MWave card is the modem card which containes the RJ-11 or
telephone plug (Illustration of MWave card at end). Note the location of
cables that are connected to this the card on the inside of the system
and unplug them. 9. Remove adapter card mounting screw at back panel of computer. 10. Remove card from slot, being careful not to pull on components on card. 11. Continue to remove cards until all cards are removed. 12. Set the NEW modem's JUMPERS or DIP SWITCHES to make the modem COM1 and IRQ 4. 13. Install your NEW modem card in the SAME slot where you removed the OLD modem. 14. Replug the internal cables to card.
This is the cable for Wake Up On Ring support and you will not have a connection for this on your new card. Make sure to tie this out of the way. 15. Replace cover and screws, being careful not to pinch loose wires in the cover as it is slid back on it's tracks. 16. Reinstall the power cable. 17. Restart computer and test. 18. Reset the SPEED in your software applications to use the FASTER modem. (Illustration of MWave card at end). 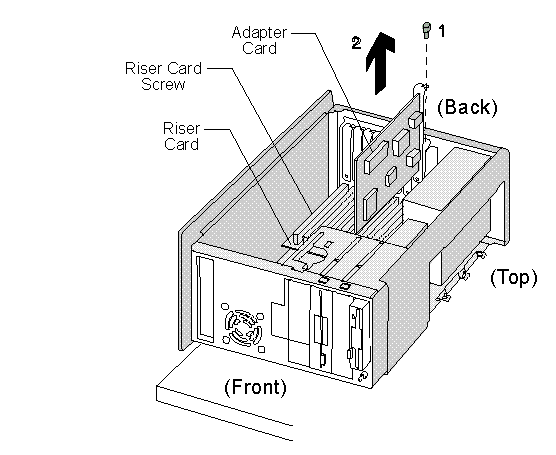
6. On tower models 2161, 2168, 2176, remove the two screws under
handle, grab the handle and pull cover toward front of computer. The
entire cover will slide on two tracks on the bottom of tower. If the
cover sticks in tracks, you may initially need to jerk forward on the
handle to remove it. 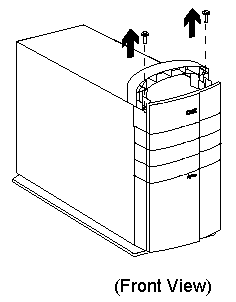
7.The MWave card is the modem card which containes the RJ-11 or
telephone plug (Illustration of MWave card at end). Note the location of
cables that are connected to this the card on the inside of the system
and unplug them. The 2159 and 2162 series computers have separate modem
and sound card and also a host card for media console installed. Remove
the screw at bottom of riser in tower unit. 8. Remove adapter card mounting screw at back panel of computer. 9. Remove card from slot, being careful not to pull on components on card. 10. Continue to remove cards until all cards are removed. 11. Set the NEW modem's JUMPERS or DIP SWITCHES to make the modem COM1 and IRQ 4. 12. Install your NEW modem card in the SAME slot where you removed the OLD modem. 13. Replug the internal cables to card.
This is the cable for Wake Up On Ring support and you will not have a connection for this on your new card. Make sure to tie this out of the way. 14. Replace cover and screws, being careful not to pinch loose wires in the cover as it is slid back on it's tracks. 15. Reinstall the power cable. 16. Restart computer and test. 17. Reset the SPEED in your software applications to use the FASTER modem.  CLICK HERE for a diagram of the external ports on an MWAVE card |