 |
Aptiva TechDoc #10025 Last updated 11/13/99 |
Power On Passwordssetting and clearing power on passwords |
|||
Although primarily designed as a home computer under some situations an Aptiva owner may wish to implement security measures to keep others from accessing their data and files. Those who do quickly find that the Windows Logon "password" feature in Windows 95/98 which can be bypassed by simply clicking CANCEL is totally inadequate as far as keeping even a child (or perhaps we should say "especially a child" in this day and age where kids are virtually born with a mouse in their hands) out. While there are a number of third-party software utilities one can purchase which can password-protect individual files and folders, as far as a no-cost option all IBM Aptivas support creating what is called a power on password. A power on password is stored in the BIOS and one must enter it each time the PC is started in order to proceed any further. If the proper password is not entered the computer simply will not start. As a power on password can be cleared and bypassed we are not talking impeneratable Fort Knox-type security here, however as doing so requires an intruder to open the tower and know exactly what jumper to reset (as you will see this varies from model to model) this does present a very real obstacle to unauthorized users attempting to poke around in your files. Unlike the Windows logon prompt this is not a "lay down and die" password. |
|||
Setting a Power On Password
Clearing a Power On Password
Clearing a Forgotten Power On Password2144, 2168, 2134, 2176, 2159, 2161, 2162, 2140and 2142 Aptiva Models On these systems the jumper which clears a user-defined power on password also serves to reset the BIOS to the original default configuration as shipped from the factory. Prior to clearing a lost or forgotten power on password enter the Setup utility and make note of any/all settings changes you personally have made so that you can re-enter them later.
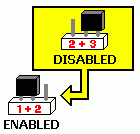
Clearing a Forgotten Power On Password2136, 2137, 2138, 2139, 2153, 2158, 2163, 2164,2170, 2171 and 2172 Aptiva Models On these systems the jumper or switch which clears a user-defined power on password simply acts as an "on/off switch" and this change will NOT reset the BIOS to the original factory default configuration. With the jumper or switch in the ENABLE position as per the table below the ability to set and use a power on password is supported, in the DISABLE position such a password will be bypassed altogether.
this point move the jumper or switch back to the ENABLE position and establish a new password in the Setup utility just as you did initially. |
|||
Things to Note - It is extremely important that the system be unplugged while moving motherboard jumpers or switches. Above and beyond any user safety issues with the AC power cord plugged in the power supply maintains 5 volts of DC standby power even when the power switch is off. As a result your motherboard can be damaged if the system is not unplugged while performing the procedures above. - When creating a power on password note that while in some cases the numeric keypad on the right hand side of the keyboard will be recognized the BIOS distinguishes between numbers typed using that keypad and numbers typed in using the number keys above the letter keys. If your password contains numbers created from the numeric keypad your system will not recognize your password if typed using the number keys. Either avoid alphanumeric passwords or make sure to enter numbers using the same keys consistantly. |
|||
CLICK HERE TO GO  TO THE APTIVA KNOWLEDGE BASE |
| © 1999, Don Schneider aka DON5408 DON5408's Unofficial Aptiva Support Site |
