|
Today's software programs just keep getting bigger and bigger all the time. While just a year or two ago a 2GB hard drive was considered LARGE these days with programs growing by leaps and bounds added to mega-MB preloaded software bundles, free space becomes an issue for most users very quickly. Todays 3D games in particular are HUGE...while 100MB games have been around for some time the full installations of some of the current crop of 3D game offerings are amazingly big by the standards of even a year or two ago. The Microsoft MotoCross Madness game that came bundled with my Diamond Fusion 3Dfx Banshee card weighs in at a whopping 445MB...had I tried to install that one program to Drive C on my C66 right out of the box it wouldn't have fit! I also note that the full blown install of one popular game (Starship Titanic) consumes an astounding 1.3 gigabytes. Fortunately the price of hard drives like most other PC hardware components has fallen to an alltime low. While as little as a year or two ago one would expect to pay several hundred dollars for a few gigs, these days quality name brand hard drives such as Maxtor on sale can be had for as little as $99 for an 8.4GB unit. I found adding second hard drives to both my Aptivas to be a very simple chore: SHOPPING FOR A HARD DRIVE: Considerations Do I Have an Available Drive Bay? All Aptivas ship with at least one open 3.5" drive bay so installing a second hard drive should be a viable option for all Aptiva owners. While the bulk of the common mini-tower models will have plenty of space and a number of open bays both the oldest Desktop model Aptivas and the latest "micro-tower" models will commonly have only one open bay. Do I Have an Available IDE Controller? All Aptivas have at least 2 IDE controllers, each of which can accomodate 2 IDE devices (hard drives, IDE CD-ROM, CD-R and DVD-ROM drives, IDE ZIP drives, etc). As such all Aptivas can support up to 4 drives. Taking into account the original hard drive and CD-ROM drive this will usually mean that two additional IDE drives can be added, however no matter what (even on the few Aptiva models that shipped with an IDE ZIP drive) at least one drive can be added. What Type of Hard Drive Do I Need? All Aptivas support standard IDE (Integrated Drive Electronics) or EIDE (Enhanced IDE) hard drive (the term EIDE is pretty much synonymous with IDE these days). While drives using the newer specs such as Ultra-DMA and ATA/66 will work fine as most Aptivas do not support these newer technologies only owners of the most recent Aptiva models will derive any benefit there. How Large a Hard Drive Can I Install? There are several size limitations that come into play as far as how large a drive the system can support and how it can be configured. See the following document for details: SETTING MASTER/SLAVE JUMPERS I found personally that the easiest way for me to upgrade storage space on both my Aptivas was to add an additional drive as a slave to the existing units. In November of 1997 I had added an 3.1GB WD Caviar as a slave to the existing 2.1GB hard drive in my 2176-C66, and in March of 1999 I installed an 8.4GB Maxtor DiamondMax in my son's 2137-E85. 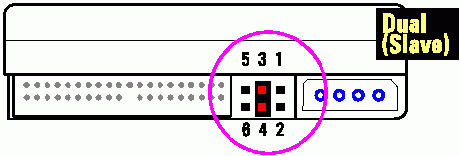 Example jumper diagram applicable to WD Caviar drives After configuring the jumpers on the second drive to the SLAVE position (see my jumper configuration information for common Aptiva hard drives as well as Western Digital and Maxtor hard drives) the actual *nuts and bolts* of the physical installation is just a matter of opening your Aptiva's case and connecting the data and power cables. CONNECTING DATA AND POWER CABLES Both my Aptivas already had a spare power connector as well as free connector on the existing 40-pin IDE-Interface cables leading to the original hard drives, which really simplifies things. Had this not been so, WD, Maxtor and most hard drive manufacturers supply a three-way data cable in the box. For those who do not have an available power cable a Y-style "splitter" cable can be purchased at most PC supply outlets and chains like CompUSA. In most Aptivas (all newer models, anyway) one should find the system already set up to just plug that baby in and go. 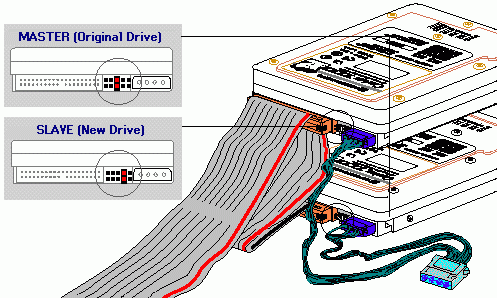 Example jumper diagram applicable to WD Caviar drives Make sure that you connect pin socket 1 on your IDE-Interface cable (indicated by the red stripe on the cable) to pin 1 on the 40-pin connector on the IDE controller as well as pin 1 on both your hard drives. MOUNTING YOUR NEW DRIVE While on the early Desktop Aptiva models I'm told that the tight fit can make installing a second hard drive a bit of an adventure, on a minitower-style PC you will have no problem finding a place to mount your new drive as there are generally plenty of open bays. You will find two mounting brackets included with your new drive but I did not require them on either of my Aptivas: - On the 2176-C66 I simply slid the new drive into the open 3.5" bay just beneath my floppy disk drive and used the included screws to securely mount the Western Digital into position. 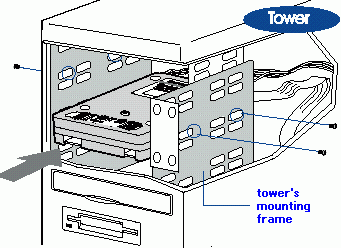 - On the 2137-E85 if anything the job was even easier. On 2137 models there is a "swing out" mounting assembly which contains the 3.5" floppy diskette drive mounted as the externally accessable "bay 4" and the internal "bay 5" which is an ideal location for a second hard drive. 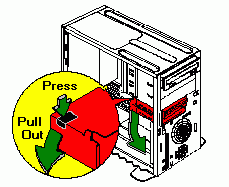 To access bays 4 and 5 on a 2137 Aptiva press the lever and rotate outward. The entire drive frame assembly will swing out on a curved track, when you see the warning arrow proceed slowly as the drive frame will become free from the tower at the line behind the arrow. To access bays 4 and 5 on a 2137 Aptiva press the lever and rotate outward. The entire drive frame assembly will swing out on a curved track, when you see the warning arrow proceed slowly as the drive frame will become free from the tower at the line behind the arrow.Once clear you can slide your new drive in bay 5, secure it with the supplied mounting screws, connect the cables and slide the frame assembly back until it locks into place. CONFIGURING YOUR SYSTEM BIOS When you first start your Aptiva after installing your new hard drive to verify that the drive is correctly installed and the full anount of disk space is recognized, tap the F1 key at the initial IBM logo screen to enter your CMOS ("SurePath Setup"). While I found on both my Aptivas that I really didn't have to do anything in Setup as far as changing any settings (the drives were both acknowledged and the full amount of disk space was displayed), in some situations (particularly on older systems) this may not be the case. If the drive is not correctly configured:
After installing a new hard drive before one can use it the drive must be partitioned and formatted. Partitioning is the act of segmenting a hard drive into valid DOS partitions. Formatting actually prepares the drive for use. There are three different ways that one can partition and format a new hard drive:
The easiest way to partition and format a new hard drive for most users is to just use the installation diskette supplied with the new drive. Such utilities are usually more user-friendly than using the old standards of FDISK and FORMAT, and in cases where the drive being installed is larger than the system BIOS supports the install disk will automatically suggest and install a third-party software solution such as EZ-BIOS. For more advanced users comfortable with using the DOS FDISK utility I'd suggest using that from an "if you want something done right, do it yourself" standpoint, however for users with terminal DOSophobia using the manufacturer's disk is generally an acceptable option if:
As far as using these install disks the two I'm familiar with (WD's EZ-Drive and Maxtor's MaxBlast) are both very simple to use. The disk is designed to be bootable, you just insert the floppy and start your PC. Generally these disks will:
Most users prefer as few partitions as possible, however due to the fact that larger than 1GB partitions are VERY inefficient under FAT16 due to the cluster sizes I'd strongly suggest using a maximum partition size of 1GB under FAT16. How much space is actually wasted by creating 2GB partitions rather than 1GB? Check it out: For a more complete discussion of partitioning issues see:
While using a manufacturer-supplied disk may be the easiest way to set up a new hard drive, the most efficient way to get the exact results one wants is to retain control over the process by using the *tried and true* DOS utilites FDISK.EXE and FORMAT.COM. While some users who cut their teeth on a Windows graphical interface may be apprehensive about using DOS if a few basic rules are understood using FDISK is really fairly straightforward and simple. What I like to think is a fairly comprehensive walkthrough of using FDISK can be found here:
Provided one is installing a second hard drive as a slave yet a third option as far as creating and formatting partitions would be a third-party partitioning utility such as PowerQuest's Partition Magic. The advantage to software like Partition Magic is that unlike FDISK which will wipe all existing data from the drive, such utilities can be used to repartition "on the fly" without disturbing existing software and files. While the extra expense of such software is by no means necessary, there are some situations under which Partition Magic can be a very convenient luxury. DRIVE LETTER ISSUES The only issue for those with 1.6GB or smaller drives which came partitioned from the factory with a single Drive C will be the fact that the CD-ROM Drive may will change. As an example if one installed an 8.4GB drive as (8) 1GB partitions using FAT16, the original Drive C (being the primary/only partition on the master drive) will remain unchanged as C:, the new drive will be D:, E:, F:, G:, H:, I:, J: and K: and the CD-ROM Drive will now be Drive L:. No matter what drive letter assignments for CD-ROM and other removable media drives will ALWAYS come after ALL hard drive letters, there is no way around this. As a result of the CD-ROM drive letter change owners of Aptiva systems that ship with bootable Product Recovery and Diagnostics CDs will find that these CDs will not function if the CD-ROM drive is assigned to a drive letter other than G:\. The solution to this issue is to create special boot disks to run these CDs, for full details click here: While Drive C (as the primary partition on the master drive) will remain unchanged, if one configures the new drive in the conventional way due to the set in stone "order of seniority" when it comes to drive letter assignments the primary partition on the second drive will now be Drive D, thus moving the secondary partition on the master drive (the former Drive D) into Drive E. This game of "musical drive letters" often requires considerable retargeting of Desktop and Start Menu shortcuts that formerly were located on D:\ to point to their location on E:\, and in some cases programs that write heavily to the Registry may have to be reinstalled. To avoid this issue when installing a second hard drive as a slave all one has to do is to pass on creating a primary partition on the second drive, setting up 100% of the drive as an extended partition only and creating logical drives within that extended partition. For further discussion of this option see my FDISK Walkthrough. BONUS TIP
|
CLICK HERE TO GO

TO DON5408's
UNOFFICIAL APTIVA SUPPORT SITE
| © Don Schneider, 1999 DON5408's Unofficial Aptiva Support Site |